Mac Meet Xbox: Part 3

December 21, 2006

Welcome back to the “Mac meet Xbox” series, Part 3, where we finally get to the good stuff. With the Xbox opened, modded, and ready to run beautiful, open-source, and decidedly non-Microsoft software, we’re going to format and install Xbox Media Center.

Getting XBMC

Yet again we run into the issue of legality in the Mac meet Xbox series, as Xbox Media Center is compiled from source code using Microsoft’s XDK (Xbox Development Kit). The XDK is a series of Windows programs, drivers, and Xbox software which allows developers to write and debug software for the Xbox. It is supposed to be available only to game publishers, however copies of it have leaked out onto the internet. The source code for Xbox Media Center is freely available and open source, but when you compile it into an Xbox program (an .xbe file, akin to Windows’ .exe files), you’re using copyrighted software, thus the resulting executable contains a portion of copyrighted code. Distributing such a copyrighted work violates the DMCA in the U.S., however laws in your country may vary. For the sake of this tutorial, I’ll leave the legalities up to you, but you should be aware of why the Microsoft XDK is publicly considered “off limits” in most discussion areas. For more details, you can visit the XBMC wiki page regarding the XDK and its involvement with Xbox Media Center.

Building Xbox Media Center from source code with the XDK isn’t a great option, let alone an easy one. Thankfully, a few charitable people build and post copies of XBMC around the net. I’ll have to leave you to your own devices to obtain a copy. As of this writing, the latest version is 2.0.1, and it can be found on popular sites. Like the BIOS files mentioned in the previous Mac meet Xbox part, XBMC is also distributed in RAR format, which must first be decompressed.

Dashboard Swap

With a shiny new build of XBMC on your computer, you’ll need to prepare the Xbox to receive the files. The community that has developed around Xbox modding decided upon one of the best choices for file transfer – FTP. We’re going to run an FTP server on the newly modded Xbox, browse through it’s carefully arranged system files, and replace a bunch of them with Xbox Media Center. First, though, you’ll need an FTP server.

In the early days of Xbox modding, a replacement for Microsoft’s Xbox “dashboard” was created, EvolutionX, and it served a number of needs: launching programs, flashing the Xbox’s onboard BIOS, changing settings, and running an FTP server. While others have since been developed, and even our very own Xbox Media Center is capable, we need something simple and easy to get off the ground. The easiest way to run an FTP server is to boot a prepared EvolutionX disc, which automatically starts the FTP service. Again, you can find discs to do the job all over the web. Burn the disc image to a DVD-R, DVD+RW, or CD-RW, which are three of the most compatible disc types – CD-Rs tend not to work well. Pop in the disc, reboot your Xbox, and marvel at the first non-Microsoft application running on your Xbox. By the time you see the spinning “EvolutionX” text, it’s ready to accept FTP connections at the IP address displayed in the Utilities menu (assuming your network setup is the same as in Part 2).

There are several Mac FTP programs that will work for the next task, however I strongly recommend Panic’s Transmit client, which has proven to work reliably with the built-in FTP servers of the Xbox programs we’ll be dealing with. Launch Transmit, and connect to the IP given by EvolutionX, with the universal Xbox FTP login:

Username: xbox

Password: xbox

Of all your passwords, this should be the easiest to remember.

When connected, you’ll be presented with a list of folders much like that of a Windows “My Computer” view: C:, D:, E:, and a few other drive letters. Not surprisingly, the folders correspond to similarly arranged devices – C: is for the main Xbox system files, D: is the DVD-ROM drive, E: is for extra files like game saves. If you’re curious, you can browse the contents of the optical drive by peeking inside D:, however the real guts of the Xbox’s system lie in the C: folder. Unlike Windows, however, the Xbox system files are stores right inside C:. Opening it will list a number of important files, but the one to note is xboxdash.xbe. This file, along with its associated fonts, sounds, and textures is the heart the Xbox software. It’s the green screen you’re used to browsing through when you have no game inserted in the console or are about to play a DVD movie. At this point, I would advise backing up all the contents of the C: drive to a safe folder on your computer, should you need them in the future. Go “up” a directory where you can see the drive list again, and simply drag C: to your Mac, and wait for it to copy over. (If you’re so inclined, you might also drag over E: to back up your saved games and other data.)

Once the contents of C: are backed up and safely tucked away, promptly delete everything in the C: folder. That’s right. Blow it away. Doing so will rid your Xbox of its Microsoft dashboard and prepare the space for XBMC. Short of re-copying the files you just backed up, you won’t be able to get back to the standard Xbox dashboard any longer. If you’re going to make this machine a media center Xbox, you might as well go all the way and make the media center the default system. With that, highlight everything in C:, and click Transmit’s “Delete” toolbar button.

Some moments later, your C: folder will be empty, ready to accept new software. At this point, if you were to reboot your Xbox without the EvolutionX disc inserted, you would receive an error stating that your Xbox needs serious repair by trained Microsoft professionals. Slim chance of that happening. Browse to the contents of the decompressed Xbox Media Center folder and find default.xbe contained within. Upload this file and all of its sibling files and folders, ensuring that the default.xbe is directly inside the C: drive. This may take some time, as XBMC totals over 100 MB and has quite a few small files which can slow down the overall transfer. Upon completion of the upload – and this is important – rename default.xbe to xboxdash.xbe. You’ll note that the original Microsoft dashboard had the same file name, thus we’ve replaced it with Xbox Media Center’s main program. Without an xboxdash.xbe to launch, the Xbox will produce an error screen. Renaming Xbox Media Center’s main program to match what the Xbox expects to find effectively tricks it into launching the new software at startup.

The Final Test

To ensure you’ve properly installed Xbox Media Center, open the DVD drive, remove the EvolutionX disc, and restart your Xbox. If all goes well, you’ll hear a startup tune and be greeted with the Xbox Media Center splash screen, and a brand new menu system. Movies, music, pictures, programs – it’s all here.

If you’ve made it this far, consider yourself an official Xbox modder. You’ve successfully opened the console, modified it to run non-Microsoft software, and installed your own replacement system. Getting this far took countless hours of cracking and coding on the part of some very dedicated hackers, and you’ve managed to follow in their footsteps to assemble your own home media center.

Mac Meet Xbox: Navigation

Part 1: Why Xbox + Choosing Chips

Part 2: Cracking the Case + Installing and Flashing

Part 3: Installing XBMC

Part 3.1: Networking in Detail
Parallels 3036 Update

December 4, 2006

While I don’t yet own an Intel-based Mac, I do keep an eye on software specifically designed for them, and am quite pleased to see that there’s continual progress with the available virtual machine software. Parallels now has some competition with the release of beta versions of VMware, which dominates the virtualization software market in the Windows world. Competition between the top VM makers is a great thing for Mac users, as they’ll continually be raising the bar, bringing new features and lower prices.

Parallels just made a major leap in their latest release, adding a new feature which utilizes your Boot Camp partition within a virtual machine. Doing this eliminates the need to maintain two installations of Windows, as well as activating XP twice with the same key. How it works is still a bit of a mystery to me, as the updated software must note the current hardware configuration of your Mac and emulate it in the virtual machine, as Windows can be picky about re-activation when devices change significantly. Unless the developers at Parallels have figured out some clever way to handle XP’s continual hardware detection, I can’t see how it would work any other way.

Technical implementation aside, being able to keep only one copy of Windows on your Mac is great, allowing you to run it in a VM when you need to accomplish a small task, and to boot it fully to play games or run more demanding software. Macworld has more details on this update, and Dan at MacUser posted his experiences with it (and some of the required utilities).

Vanishing Shuffle Music

November 30, 2006

The Cult of Mac blog, AppleDefects, and others noted that many 2G iPod Shuffle owners have been reporting troubles with their new players, in which music inexplicably disappears and iTunes reports “The required disc cannot be found.” Most notably, it has been happening with podcasts:

I had noticed that the Shuffle reports way more “updating iPod” notices than it should, as well as the alarming message above, which occurs every time I plug in my player, including several times after it’s been updated and nothing changes – just clicking into the iTunes window causes it to worry. The podcasts flip their indicator from played to unplayed and back, and it locks up.

It seems that these problems are not limited to 2G iPod Shuffles. Just this morning I had the same problems with my first generation 1GB Shuffle, and ended up just deleting everything and dropping in a podcast or two before heading out. This took several tries, of course, and required dismissing more than a dozen errors, so I decided to investigate when I had more time. Even after experimenting a bit, I’m still not sure of the source of the problems – perhaps it’s an issue with the latest firmware, iTunes 7.0.2, or even a defective TWiTcast – but running Apple’s iPod Shuffle Reset Utility completely erased my Shuffle and reloaded the software, giving it that factory fresh feel. Apparently, the “brick it and bring it back” method works wonders for iPods. Since resetting it, I’ve encountered no problems, and have enjoyed a number of podcasts and songs without issue. Keep in mind, the Shuffle Reset Utility is only for 1G Shuffles, so this won’t solve the issue with 2G models, but hopefully a fix for this annoying bug is in the works.

Classic Features

November 29, 2006

While I’ve long since ditched Mac OS 9 and earlier, there are a number of features I wish Apple had brought along. The Apple Blog notes 10 of their favorites, of which I only miss a few. Little things like emptying the Trash, tabbed folders, and download URLs in file comments all made Mac OS 9 pleasant “back in the day.”

Classic Mac OS used to prompt you before emptying the Trash while displaying the total size about to be eliminated. Knowing approximately how much disk space was about to be gained was, as the author put it, “one of the biggest reasons people ever empty the trash” – to get back some storage room. Perhaps this is an opening for a small freeware Mac app, one which labels the Trash with the total size, much like Mail’s red starburst unread message count.

While I can’t say that I’ll miss WindowShade or Appearance themes from Mac OS 8 and 9, I did enjoy keeping a bunch of tabbed folders along the bottom row of my screen. The Dock makes up for much of the functionality today, however it still lacks the pop-up ability that tabbed folders were known for.

The last little feature of the classic Mac OS that came in handy was that the URL of downloaded files was added to the Comments field. Having this was occasionally necessary later on, but I was disappointed to find that this feature is no longer built into OS X. Thankfully, the free utility DownloadComment will do exactly the same, adding the URL to the Spotlight Comments field, not only saving the link for future reference, but also making it searchable system wide.

iPod 5G Hard Drives

November 20, 2006

Lately I’ve been working with some 5th generation iPods trying to come up with a way to really test the hard drives in them. Unlike the previous full-size iPod models (excluding the mini and shuffle), the 5th gen uses a hard drive with a different connector.

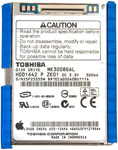
iPod 5G Hard Drive

Generations 1 through 4 used a Toshiba drive with a 1.8” IDE connector. The new drives are still manufactured by Toshiba, however they use a ZIF (Zero Insertion Force) connector instead of pins which were big enough to solder to. The new ZIF connector they’ve employed works exactly like the LCD connector on the 4th generation iPods, holding the thin ribbon cable tightly until the plastic lever is flipped up parallel to one of its long edges. Designing a connector this way – as opposed to the previous version with pluggable pins – not only allows electronics to get much smaller, but significantly reduces the amount of physical stress created when plugging and unplugging cables. Unfortunately for us, this makes current adapters useless for testing 5th gen iPod hard drives. With a new way to connect hard drives, what can be done to adapt them to IDE just as before? Up to this point, it’s all theory until I can get my hands on some more hardware, but I have a plan.

The first step in determining whether adapting is even a viable option was to read Toshiba’s data sheet on the new hard drives, which details the signals of each miniscule pin. I was hoping that, like the 2.5” to 1.8” shrink, nothing major had changed. Indeed, nothing but the new connector had been modified, making future work that much easier. The IDE pins remain intact, just…much smaller. The new drives run on 3.3v, but like other adapters, the drop from 5v to 3.3v is trivial compared to the task of finding or making an adapter to scale down the size of the pins.

Hitachi Adapter

Knowing that the signals are the same, I started hunting for a pre-made adapter to see if something that fit my needs already existed. It seems the topic of adapting these new Toshiba drives is one hardly touched upon. The only useful result was an expensive adapter from YEC, which is intended for Hitachi ZIF hard drives and includes a ribbon cable to connect the drive to the board. It looked close enough, so I investigated some more by emailing the company and posting on their message boards. As it turns out, the Hitachi hard drives use the same pin configuration as the Toshiba drives, but the ribbon cable that ships with the adapter is too thick. Hitachi drives are designed to take a slightly thicker cable than the Toshiba models. YEC’s adapter board is pin-compatible with the Toshiba drives, but they don’t yet offer the all-important thin ribbon cable. Curious, I asked if the Hitachi cable would be thin enough to work, perhaps even with some modification, but they responded that it is simply too thick to work with the Toshiba drives. YEC plans to offer a Toshiba ribbon cable in the near future, but as of this writing they have no availability date. (I should note at this point that I already intended to buy an adapter from them if it would fit, as I was amazed to find myself communicating with one of the engineers at the company – unheard of in today’s corporate environments!) Short of a fully functional adapter that I could buy now, I thought I was out of luck, since finding a compatible ribbon cable in a random electronic device is a pretty slim chance. Or is it?

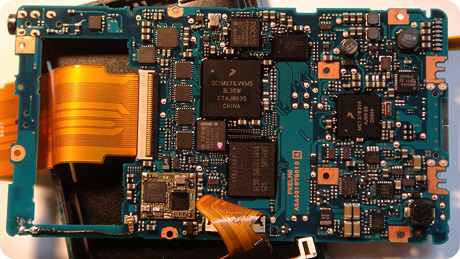
Mere hours after I had scoured Toshiba’s website for pinouts, I found that engineer and Xbox hacker extraordinaire Andrew “bunnie” Huang had received and disassembled a new Zune (as I noted on MacUser). Looking at his pictures, you’ll note that the Zune uses a new Toshiba ZIF hard drive, just like Apple’s 5th Gen iPods. No surprise there. The drives are reliable and small enough to accomodate most handheld players. However, the ribbon cable Microsoft uses appears to be the exact piece required to adapt the YEC adapter to the Toshiba ZIF hard drives:

Zune Logic board

Gathering all the pices to assemble a Toshiba ZIF adapter looks to be quite costly at the moment – $120 for the board (which is nothing more than a few cheap components) plus $249 for a Zune. My hope is that I can find a broken one on eBay to scavenge for parts. Unless I find a better alternative in the meantime, I think I may be forced to wait for YEC’s ribbon cable to be made available. I’ll keep this post updated with any future findings.

(I also feel compelled to make a note of bunnie’s book, Hacking the Xbox, an affordable and incredibly detailed look at the work that went into reverse engineering all the security mechanisms of the original Xbox. If you’re interested in reverse engineering and want to get a feel for what it takes, or are curious exactly how the Xbox was cracked, check it out.)

12/30/2006 Update: The folks at Addonics replied to my email and reported that they will offer a 1.8” ZIF to IDE adapter in January 2007, so be sure to look for one very soon.

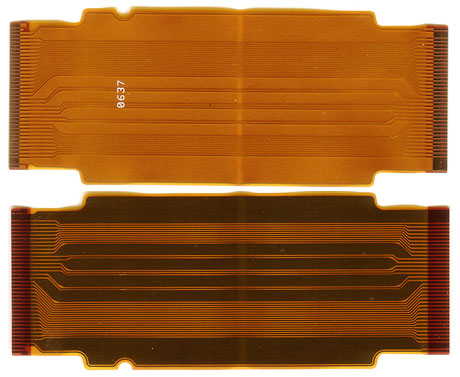
3/11/2007 Update: The adapter from Span works, but it still a little pricey, and – like the iPod 5G itself – fragile. It gets the job done, though. I’ve yet to try a Zune hard drive cable with it, as the included cable is a little thick for Toshiba drives. For interested hardware hackers, here’s a very high res image of the Zune hard drive cable I scanned (about 1.1MB in size).

Zune Hard Drive cable

Mastodon