Mac Meet Xbox: Part 3.1
Networking a Mac and an Xbox can sometimes be troublesome, occasionally involving unusual network setups, so I decided to publish this little Mac Meet Xbox addition to better cover the subject. Having in-depth, detailed knowledge of networking isn’t necessary, but some basic concepts are key in keeping Xbox Media Center updated with new builds and fresh content.
For most, there are two main ways of attaching your devices: using a router as a central network hub, and wired Ethernet using a “crossover cable.” Both ways work, and the choice is up to you depending on your existing network setup or personal preferences.
Key Networking Technologies
Before you can begin learning about the details of the specific scenarios, a little foundation knowledge will go a long way towards helping you understand how each setup works.
The most common method of getting your Xbox and Mac talking to each other is with the use of a home internet router, be it wired or wireless. To be a router, your networking hub must have some core functionality that’s found in all routers, which includes IP distribution, internet splitting, and switching. Every router or internet gateway you can find on store shelves today will offer these features and more, so you generally don’t need to worry whether or not your particular router does these things.
IP distribution, the fancy-sounding Dynamic Host Configuration Protocol, or more commonly called “DHCP” is the core of the router’s functionality, automatically providing IP addresses to connected computers. When a computer is connected and set to automatically find an IP address, it talks to the router and negotiates assignment of an IP address. When accepted, the computer can talk to others on the same network. Apple likes to call DHCP “Automatic” in many cases, and static “Manual.” They’re just friendlier-sounding words compared to the alphabet soup that is most computer terminology.
Usually, the main goal in purchasing a router is to “split” a single broadband internet connection into many connections, allowing multiple computers and devices access to the internet. The router achieves this using a technology called Network Address Translation (NAT), in which it modifies all packets destined for the internet to have the address of your cable or DSL modem, not the internal IP address of your computer assigned by its DHCP server. Outbound packets have a note made of them in its memory, so when the response packet comes back from the internet, the router looks up which computer it should go to. It’s a clever technology that allows multiple devices to masquerade as one, and your ISP is none the wiser.
Finally, the last major feature that routers inherently provide is switching. Switching is nothing more than intelligent data moving, which has the side effect of making things more secure. Networking technologies of several years ago relied on hubs, which are actual devices, compared to the more general “central location” hub referred to above. A hub was just a device that allowed multiple computers to talk to each other by means of simply shouting at everything connected. When data was sent into a hub, it went out every other port in an attempt to reach the destination computer. If the destination was within reach, it, too, would shout back, keeping all the other attached computers within “earshot.” Any computer attached but not involved in the shouting match as it were, could keep a record of both sides of the conversation, which is bad for security. Switching avoids this problem by keeping track of the port through which each computer is reachable. If necessary, more than one switch can be involved, yet each knows its role in getting the data to the destination without involving other computers. This not only cuts down on potential eavesdropping, but reduces overall network congestion – computers no longer have to wait for the shouting to stop to get their packets on the network.
Why Use a Router with XBMC?
With all the fancy features provided by a router, what applies to getting Xbox Media Center off the ground? At the very least, it gets you and your Xbox an internet connection. For your computer, the internet use is obvious, but Xbox Media Center also uses the internet to get weather, RSS news feeds, IMDB movie information, and more. Simply plugging in your Xbox and computer will get you that much by relying on the DHCP capabilities of the router.
The Router Setup
Most home routers are very straightforward – plug the device into wall power, run Ethernet from your cable or DSL modem the the Internet/WAN port, and run Ethernet to your Mac and Xbox. If your Mac has an AirPort, AirPort Extreme, or other wireless card installed and your router has antennae, you’ll also have the option of just linking up your Mac wirelessly. Both Ethernet and wireless work, and the only noticeable difference is data transfer speed. When copying a 700 MB movie to your Xbox, Ethernet speeds will blow away wireless (at least until 802.11n becomes more popular). After all the devices are connected and powered up, the router will assign them IP addresses, and everything will have internet access and the ability to communicate with each other.
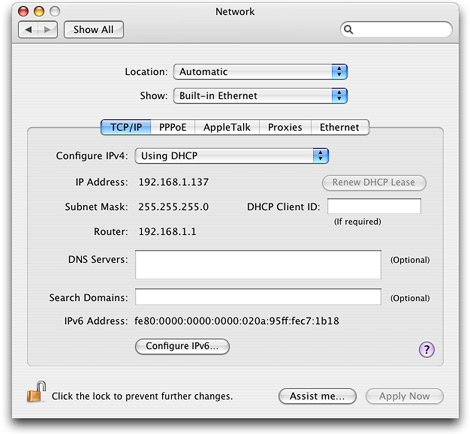
You can view your Mac’s IP address by opening your Mac’s System Preferences, Network, Built-in Ethernet, TCP/IP tab, shown here:
And just like you’d expect from the Mac, that’s it! No other setup is needed. To connect to your Xbox, you’ll need to find out its IP address, which you’ll FTP into to transfer movies, music, games, or whatever media you choose to play. Boot your Xbox and simply scroll down the main list and highlight the Settings tab. On the right, the assigned IP address will be displayed:
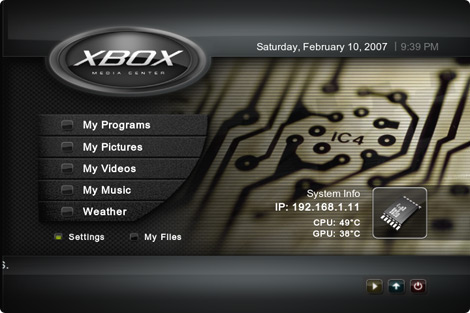
As you can see, the IP 192.168.1.11 is given, which is the same address you would use to connect using Transmit or other preferred FTP client. Using a router makes networking your hardware very easy, especially with the DHCP capabilities that do all the legwork for you.
Why Use a Crossover Cable with XBMC?
A router is usually the most universal way to use XBMC, however there are times and setups where you may not have 24/7 internet access, a router is too far away, or you’re simply in a rush to copy a file over. A crossover cable is a relatively common piece of network cabling, which “crosses over” the “talk” and “listen” wires, making one device talk directly into the other’s listen connection, and vice versa. In doing so, the need for a router or wired switch is made unnecessary. This setup will yield the fastest overall transfer speeds, however a router really doesn’t introduce a noticeable delay.
Crossover Cable Setup
Hooking up your Mac and Xbox via a crossover cable is as simple as plugging it into the Ethernet ports on both machines. Unlike the router setup, though, they can’t immediately communicate. Both the Mac and the Xbox are normally set to use DHCP to get an IP address. As you recall, the router provides this service, but it’s no longer in the picture, so the devices therefore can’t receive IP addresses without some additional setup. To make the configuration as easy as possible, you can set both devices to have static/manual IP addresses, as opposed to automatic.
Once connected, visit the Mac’s Network settings (again, System Preferences, Network, Built-in Ethernet, TCP/IP tab). Change the “Configure IPv4” popup menu to Manually, and a number of fields will become editable. Fill in an IP address such as 192.168.1.10, and a Subnet Mask of 255.255.255.0. A router isn’t used in this setup, so the Router and DNS Servers fields can be left blank. Here’s a screenshot of a properly configured Ethernet interface on the Mac side of the network:
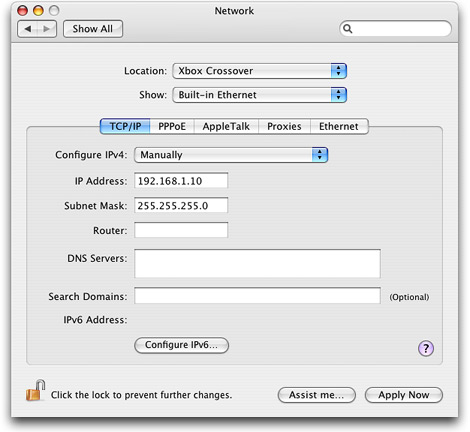
Unless you’re sharing an internet connection under the Sharing system preference pane, static is the only option for a crossover cable setup. And, quite frankly, setting all your networked devices to static IPs is probably a good choice in any arrangement if you intend to be interacting with them regularly. You’ll always know which IP to connect to in order to get to the machine you expect. (On my home network, I personally use a router with DHCP enabled, but have all my computers and Xboxes set with static IP addresses so I know where each is when I need to talk to it. Any other computers, such as my fiancee’s laptop, simply get an IP assigned via DHCP when it connects.) Hit “Apply Now” to invoke the new IP setup, and your Mac will be configured.
Next, boot up your Xbox running XBMC and open its Settings page. Highlight the Network tab if it’s not already selected, and move the selection over the Assignment up and down arrows, and choose “Manual (Static)”, as seen below:
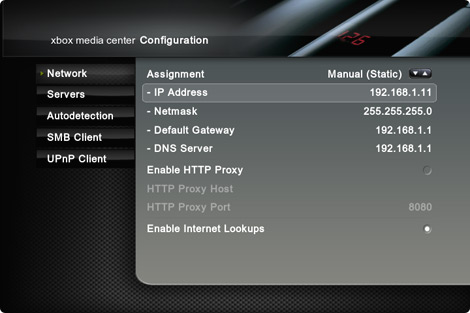
Once “Manual (Static)” is chosen, you can move the selection down to the IP Address field and type in the desired IP address using the little onscreen number pad. Choose something reasonable (an ending number anywhere between .2 and .254), and one that’s not the static IP of your Mac. That last bit is important – the two devices absolutely must have different IPs, or else they’ll be fighting for control and probably both end up disconnected until you change one of them.
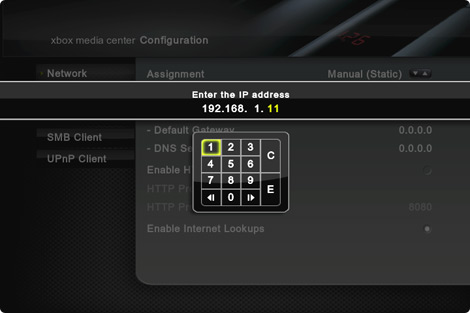
Once you’re done typing an IP, press the “E” key onscreen to Enter your settings. Step back out of the Network settings using the Back button on your controller or remote, and head back to the main XBMC menu. For good measure, reboot your Xbox using the red button in the lower-right corner, and it will start up fresh with the static IP set exactly how you typed it. You’re then ready to connect via FTP using that IP, and start loading up content, browsing around the Xbox filesystem, or updating Xbox Media Center!
I hope this networking tutorial shines some light on what seems to be a trouble spot for many a new Xbox modder. If you still have questions, feel free to post a comment using the form below.
Mac Meet Xbox: Navigation
Part 1: Why Xbox + Choosing Chips
Part 2: Cracking the Case + Installing and Flashing
Part 3: Installing XBMC
Part 3.1: Networking in Detail