By Collin Allen

iPod Screen Scratch Removal Revisited

January 6, 2009

Several years ago, I recommended RadTech’s IceCreme as a great solution for cleaning up your iPod’s scratched-up screen. While I still stand by my results and recommendation, IceCreme isn’t the sort of thing you can find at a nearby store, and is also a little pricey. Removing scratches from iPods and other pocket-bound electronics remains a common problem, so I thought it would be worthwhile to test some of the other available options. Additionally, since nicks and scratches occur on more than just the screen, we’ll also test the solutions elsewhere on an iPod. For this little experiment, I chose three solutions offering varying levels of abrasiveness: Colgate toothpaste, Brasso metal polish, and Easy-Off oven cleaner. All three promise to leave their intended surfaces shiny and clean, and in the case of the latter two, free of scratches. We’ll see how each fares when put to use on both the front plastic and back metal of an iPod.

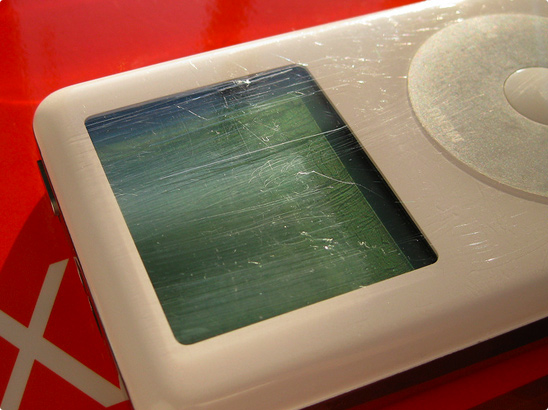
To keep things clear, each polish will be used in a masked-off area, hopefully leaving a clear division among the results. The target iPod is an already well-used 4G 20GB iPod, with most of its still working inner parts removed and replaced with padding just to help sustain its form while being polished. Donated to the cause, this iPod will be beat up even further, with even layers of light scratches, heavy scratches, and deep cuts, simluating everything from normal wear to keychain induced destruction. It has surely seen better days, and is now destined for that great Apple Store in the sky, all in the name of science. I started with Brasso first, since it has been recommended many times since my last scratch removal post, both by commenters and firsthand accounts. If you’re attempting this yourself, be sure to work in a well ventilated area, as Brasso smells very strongly of ammonia, and might start to irritate your eyes after a short while!

scratched ipod with brasso

After only five minutes of polishing, the results were quite good, with nearly all of the light and medium scratches completely removed from the screen area. Deeper cuts remained, though their rough edges were significantly smoother.

polished ipod with brasso

Toothpaste was next on the list, and while it left the iPod minty fresh with a sparkling shine, its scratch-reducing effects were barely noticeable. Due to its sticky consistency, it was also more difficult to polish with than the more liquid Brasso, yielding poorer results for double the effort – a total flop. Oven cleaner was last, and I really had no idea what to expect with it. Claiming to leave glassy surfaces shiny and free of scratches, it sounded like a possible winner. As it turns out, it’s not much more than a repackaged kitchen cleaner, resulting in a streak-free but still heavily scratched iPod. I’ll end up cleaning my glass top oven with this one, and nothing else. With the front of the iPod clearly showing Brasso as the top choice, it was time to see what worked best on the scratched metal backing of the iPod.

ipod with scratched back

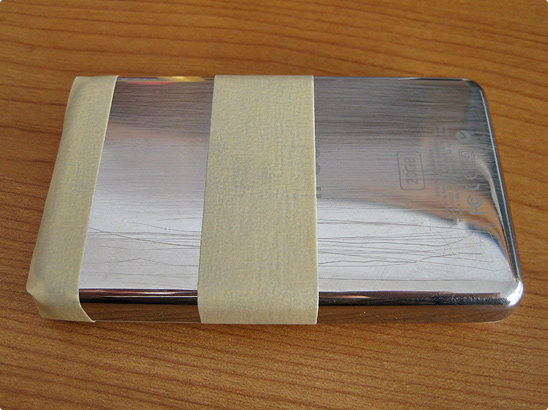
Again, after just a few minutes with each polish, Brasso came out on top, while the other two trailed woefully behind. The Brasso-polished back still had quite a few scratches, though far less pronounced than when I started. All of them, including the deep cuts, had a very slick feel, whereas the others still left the surface pretty rough.

scratch comparison

Convinced that Brasso was the right choice, I went back and finished off the front, cleaning up all but the most severe marks on the screen.

ipod front

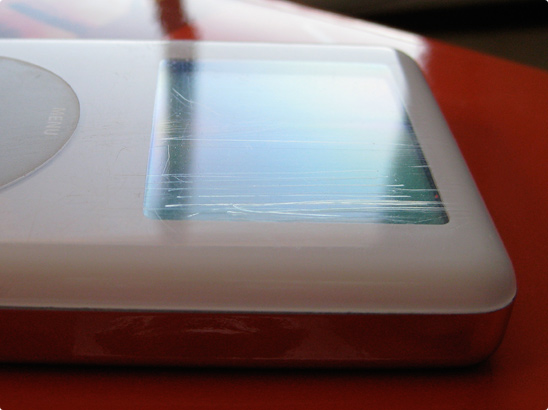
Given the results of my tests, I can easily recommend Brasso as a great iPod polishing solution that can be had for under $3 at your local stores.

Learning Cocoa for the iPhone

December 21, 2008

These last few weeks, I’ve been teaching myself Cocoa to learn what makes Mac OS X and iPhone OS apps tick. While Objective-C is quite a departure from my usual web development world, it has quickly become one of my favorite languages, as it takes care of much of the drudgery of pure C and has plenty of useful frameworks to get your application up and running quickly. Here are some of the best resources I’ve found so far:

  • Cocoa Dev Central and Become an Xcoder are both excellent tutorials for beginners, written in a clear, straightforward manner. They also explain the ins and outs of memory management, which is critical on platforms like the iPhone and iPod touch.
  • Stanford’s CS193P lecture notes and examples have proven to be one of the best resources for learning Cocoa, particularly for the iPhone. These notes and tests offer Cocoa Touch in bite-size chunks, with a little bit of “on your own” work to ensure you know your stuff before moving on.
  • Google Code Search is a good last resort for examples of how others are using a small bit of code or a particular class. For more accurate results, append “lang:objectivec” to your search string to narrow results to only Objective-C code.

Consolas Cursor Fix

December 16, 2008

If you’ve attempted to use Consolas as your choice programming font on the Mac, you may have noticed (as I did) an odd issue with the font, where your blinking cursor hangs much lower than the current line. Oddly enough, this little issue only seems to affect Mac OS X. Even the Consolas set that ships with Microsoft Office 2008 has the same problem! Yet, when the same exact font file is used under Windows, the cursor position is correct.

John Gruber mentioned that BBEdit 9.1 now ships with Consolas as its default font, so I decided to see if it had the same cursor problem I had experienced in the past. As it turns out, BBEdit’s version of Consolas works just fine, as seen in the image above. However, it doesn’t include the other styles like Consolas Bold, Italic, and Bold Italic.

Through one way or another, the copy of Consolas that ships with BBEdit 9.1 is different than the one that ships with Microsoft Office 2008. To make system-wide use of the working version, download BBEdit 9.1, mount and open the .dmg, and navigate to:

(Control-click BBEdit, and choose “Show Package Contents” to get inside the application bundle): BBEdit.app/Contents/Resources/Fonts/consola.ttf

Copy consola.ttf from BBEdit’s “Fonts” folder to your own Fonts folder at /Users/you/Library/Fonts, or /Library/Fonts if you want to make it available to everyone who has an account on your computer. Then, fire up your favorite editor, set Consolas as your preferred fixed-width font, and get coding!

Update: Bare Bones has apparently changed the version of Consolas that ships with BBEdit versions later than 9.1, and they now have the cursor problem as well…

iPhone NDA Dropped

October 1, 2008

After hearing the cries of thousands of upset iPhone app developers, Apple has lifted the non-disclosure agreement covering (released) iPhone software. Developers can now freely talk about the inner workings of their applications, write books, publish blog entries, etc. Communicating developers means solutions to common problems get solved and shared, resulting in better software, making the iPhone and iPod Touch platform better as a whole.

For some time I’ve been worried that the NDA was going to remain in place indefinitely, silencing those who Apple needs the most, but it appears Apple has finally taken a positive action to help their App Store environment grow further. If you thought there was some cool stuff on the App Store now, just give it time.

iPhone and iPod Touch Icon Template

September 21, 2008

While working on some iPhone and iPod Touch apps, I found that the iPhone OS automatically masks and overlays your application icon for quick and easy development. You supply a square 57x57 pixel image, and it rounds off the corners and overlays the Mac-like gloss to create a consistent look.

When developing an icon for a Touch-based application, it’s handy to be able to see what your rendered creation will look like without going through the hassle of exporting your icon, compiling your code, and running your software every time a change is made. To that end, I present a small Photoshop file which very closely mimics the iPhone-applied mask and gloss, which you can place over top of your in progress icon layers to approximate the final result. Also, if you dislike the gloss, or have something special in mind, you can set a certain flag in the application’s Info.plist to disable the gloss… I hope my Photoshop file will help others create great looking Touch app icons!

Update: By request, I’ve added a 512x512 version of the template as well, so you can get a good feel for what your icon will look like when displayed in iTunes. Both files are now combined in a zip archive, downloadable here.

Mastodon