A number of people have asked about upgrading iPod hard drives – what to buy, how to prepare, and how to perform the upgrade – so here are all the technical details. If you’ve never worked inside an iPod before, this is certainly an advanced tutorial, but don’t let that scare you. Working slowly and methodically, you too can upgrade your iPod and store even more music, photos, and videos.
What to Buy
Which hard drive to buy depends on your specific iPod model, so like any half-decent attempt at an upgrade, a little research will go a long way towards making a good purchase. The main factors that will affect your decision are the height, or thickness, of both the iPod and hard drive, and the connector style employed by both. Since day one of the iPod launch, Toshiba has produced all the hard drives employed in the full size iPod lineup. While they enjoyed a profitable OEM business arrangement with Apple, the drives are in no way exclusive to the iPod, and they can be found in many other products, including (not surprisingly) some Toshiba laptops and (perhaps more surprisingly) Microsoft’s Zune player. To allow for some flexibility in product lineups, Toshiba’s 1.8” hard drives come in two thicknesses – the thinner has one physical storage platter inside, and the thicker has two. Doubling-up of the storage surfaces is why you’ll often see a given capacity drive, and the next step up of two times that capacity. As technology advances, the capacity of each surface increases while the dimensions remain fixed for easy interchange-ability. This is good news for iPod upgraders. The longer you wait, the more you can store in the same amount of space.
Apple’s iPods are fairly easy to find a matching replacement/upgrade hard drive for, as you can generally tell which thickness drive you need just by comparing it to the others of its family. If your iPod was the thicker of the series when you purchased it, it takes the thicker, two-platter hard drive (examples include the then-higher capacity models such as 40 GB iPod and 60 GB iPod photo). The thinner models (like the 15 GB iPod and 30 GB iPod photo) take the thinner hard drives.
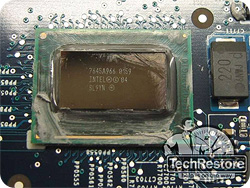
The 5th generation iPods with video capability are a different beast, as the drive technology and space requirements have demanded smaller internals. With that in mind, Toshiba engineered a new connector on recent drives that is vastly smaller than the previous models. These new drives sport a Zero Insertion Force (ZIF) connector, which, unlike the older iPods, requires no pressure to connect the cable. Simply holding the hair-thin ribbon cable in place and folding down a clamp-like lock will secure all 40 pins in a staggeringly small, fragile connector. The connector on the 5G iPods’ logic boards is now no wider than your thumbnail, and it, too is quite delicate. Such is the way of ever-shrinking consumer electronics.
Tools of the Trade
Before you decide on a hard drive, you’ll also want to purchase a few tools to ensure the job gets done right. While you’re able to pry most iPods apart using a tool as simple as a butter knife, the professionals use the following to make entry, upgrade, and close-up as invisible as possible.
- Apple’s “black stick”: This nylon-based pry tool is key to almost any iPod upgrade, as it provides a strong lever to get into the edges of the case, while its plastic properties leave next to no marks or chewed-up looking spots along the edges. Best bought from Stanley Supply & Services.
- IC puller or hemostats (both available at your local RadioShack): Either of these tools will work for undoing the iPod battery cable and handling some of the smaller pieces of the iPod. Not necessary, but highly recommended if you plan on doing more than one upgrade.
- A straight razor blade (for 5G iPods): I was hesitant to include this, as it’s a recipe for injury if you’re not careful. In the interest of completeness, though, it’s here. The latest iPods are sealed very well, and more often than not they require a very thin and flexible bit of metal to make room for Apple’s Black Stick pry tool.
- HD adapters from Addonics: 1.8” to 2.5” IDE and 2.5” to 3.5” IDE: To do testing or erasing on iPod-size hard drives, these adapters will get your 4G-or-earlier drive hooked up to a desktop computer’s IDE bus. (For 5G iPods, see this post) Also not necessary, but again, these are recommended for advanced testing and erasure.
Picking a Hard Drive
Depending on your iPod thickness and model, you can choose from the hard drives in the table below. Note that some of these models are not used in iPods, but should work just fine (for example, the 20 GB ZIF drive, which will only connect to new iPods which start out at 60 GB from Apple – technically a downgrade, but listed for compatibility information).
| Brand |
Model # |
Capacity |
Connector |
Thickness |
Supported iPods |
| Toshiba |
MK1011GAH |
100 GB |
ZIF |
8mm |
Thick 5G, 5.5G |
| Toshiba |
MK8007GAH |
80 GB |
Pins |
8mm |
Thick 2G, 3G, 4G, photo |
| Toshiba |
MK8009GAH |
80 GB |
ZIF |
8mm |
Thick 5G, 5.5G |
| Toshiba |
MK6006GAH |
60 GB |
Pins |
8mm |
Thick 2G, 3G, 4G, photo |
| Toshiba |
MK6008GAH |
60 GB |
ZIF |
8mm |
Thick 5G, 5.5G |
| Toshiba |
MK4006GAH |
40 GB |
Pins |
8mm |
Thick 2G, 3G, 4G, photo |
| Toshiba |
MK4008GAH |
40 GB |
ZIF |
8mm |
Thick 5G, 5.5G |
| Toshiba |
MK4007GAL |
40 GB |
Pins |
5mm |
1G, Thin 2G, 3G, 4G, photo |
| Toshiba |
MK4009GAL |
40 GB |
ZIF |
5mm |
Thin 5G, 5.5G |
| Toshiba |
MK3006GAL |
30 GB |
Pins |
5mm |
Thin 2G, 3G, 4G, photo |
| Toshiba |
MK3008GAL |
30 GB |
ZIF |
5mm |
Thin 5G, 5.5G |
| Toshiba |
MK2004GAL |
20 GB |
Pins |
5mm |
1G, Thin 2G, 3G, 4G, photo |
| Toshiba |
MK2006GAL |
20 GB |
Pins |
5mm |
1G, Thin 2G, 3G, 4G, photo |
| Toshiba |
MK2008GAL |
20 GB |
ZIF |
5mm |
Thin 5G, 5.5G |
| Toshiba |
MK1504GAL |
15 GB |
Pins |
5mm |
1G, Thin 2G, 3G, 4G, photo |
| Toshiba |
MK1003GAL |
10 GB |
Pins |
5mm |
1G, Thin 2G, 3G, 4G, photo |
| Toshiba |
MK5002MAL |
5 GB |
Pins |
5mm |
1G, Thin 2G, 3G, 4G, photo |
| Toshiba |
MK5004MAL |
5 GB |
Pins |
5mm |
1G, Thin 2G, 3G, 4G, photo |
| Seagate |
ST760211DE |
60 GB |
ZIF |
5mm |
Thin 5G, 5.5G |
Update: It appears that the 4G may be firmware-limited to no more than a 60 GB drive. Reports indicate that drives above 60 GB in capacity appear as 60 GB despite the additional storage that’s available.
You can find many of the above drives on eBay and online retailers, but the most prevalent ones will be models used in iPods that shipped in the past. I have used many non-Apple-branded Toshiba hard drives without issue, confirming that there is nothing particular about them, except an Apple logo on the sticker. Having a third party manufacturer such as Toshiba re-brand a product is nothing new to the computer industry – other big companies like Dell and IBM work deals like this for many components.
Hard Drive Preparation
Unlike my iPod Super hack, a replacement iPod hard drive does not require any special formatting or filesystem preparation. In fact, I’ve found that working with a completely empty/zeroed hard drive works best. If you decided to purchase the adapters listed above, you can connect them as detailed in my Really Testing iPod Hard Drives post, and completely erase the hard drive using the handy Darik’s Boot and Nuke utility. I’ve found that it works best to have a zeroed hard drive, but it can often be done without. (The iPod sometimes tries to find software on the hard drive, which may be incorrect for its generation or be corrupted).
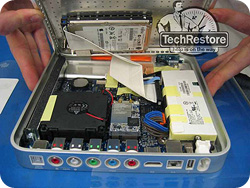
Opening the iPod
To get at the old hard drive, you’ll need to open the iPod, which is usually the hardest part of the process. 1G through 4G iPods aren’t as tough as the 5G and later iPods, and can be popped open by pushing the metal backing one way while pulling the plastic front the opposite way. In doing so, you create a small gap where you can slide in the nylon pry tool and undo the five plastic clips along one of the two longer sides. The inside top and bottom edges of all iPods are not secured. Other World Computing has some detailed take-apart videos which should help give you a good idea of exactly how to get inside.
To open a 5G or later iPod, try the first technique above, and use a straight razor as a last resort. For the really tough ones, work the sharp edge of a new razor perpendicularly into the side seam where the front plastic and back metal meet. Once wedged between the two halves, tip the dull edge of blade towards the front (towards you), using the iPod’s plastic side as a fulcrum to open a small space to insert the nylon pry tool. This is extremely dangerous! Not only are you working with a super-sharp piece of metal, you’re flexing its brittle structure, which may cause it to shatter – so don’t push too hard. I’ve never gotten cut or had a razor shatter while doing this, but only because I took my time and didn’t get my fingers near the sharp edge. Moving slow and thinking smart (as smart as bending a razor can be) are keys to making this technique work. Once the nylon pry tool is in place and has a little room to work, carefully extract the razor and set it aside. Use the pry tool to work the rest of the side clips open. If you feel at all uneasy about this method, it’s probably best to leave it to the professionals – the 5G iPod is a giant leap forward in design and engineering, at the expense of a lot of end-user serviceability.
The Switch
After cracking the side of the iPod open, carefully disconnect any audio jack or battery ribbon cables attached to the back panel. Undoing these connectors often requires the use of the nylon pry tool again, or careful pulling with hemostats. Be sure to pull the connector straight away from the logic board, using only minor side-to-side wiggling as needed. Attempting to pry the connector out of its matching socket without keeping it straight can result in the connector separating from its cable!
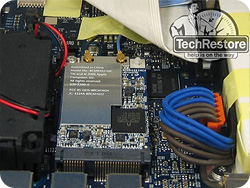
With the halves unhooked, the panels can be separated, exposing the hard drive. 1G through 4G iPod hard drives can be unplugged by simply pulling the connector straight off the end of the drive, whereas the 5G and later iPods require you to flip up the narrow lever. It hinges lengthwise along the middle. The lever does not fold flat backwards when open, but simply stands upright, and should not separate from its other retaining half.
Install the new hard drive in the same direction as the old one, making sure all pins and plastic guides line up. 5G iPods are especially tricky due to the ZIF connector. Yet again, some tiny tools may come in handy – just be sure to work gently with its delicate ribbon cable. Move the metal back panel close to the iPod and reconnect all the cables you unhooked to get into the device, and snap the panel back onto the plastic clips.
Restoring in Disk Mode
Pressing any button will power on your iPod, and you should be able to hear the new drive spin up. Unless the drive is preloaded with precisely the correct software, you will get a “sad iPod” face. This is okay! Reset your iPod using the iPod reset commands, and immediately hold the Disk Mode keys as soon as the screen blanks for the reboot. This may take a few tries, but as long as your iPod doesn’t have the correct data on the drive, you’ve got all the attempts in the world to get into Disk Mode. When done properly, you’ll see “Disk Mode” at the top of the iPod. You can now plug the freshly upgraded iPod into your computer and launch iTunes. After it’s detected, iTunes may complain about a corrupted iPod. Dismiss any dialogs and browse to the Summary tab for the iPod, and click Restore. iTunes will load the proper software onto your iPod, and it will be as good as new – with more capacity!
Update: I added the Seagate ST760211DE 60 GB 5mm drive following a painless drop-in replacement report from reader Jerry Wnorowski:
Well it finally arrived, and with just a little hesitation, after all this was entirely new ground for me, I installed the 60GB Seagate hard drive into my broken 30GB iPod Video 5.5 Gen. When I plugged it in to my laptop, iTunes said it needed to be restored. I restored it, and it booted and came up in iTunes! I loaded my music, and now I have the thinnest 60GB iPod Video in the world!
Update: A 240GB iPod modification is now available for those who want TONS of storage space in one portable device.