Delivery Status Widget

July 23, 2008

I don’t use the Dashboard in Mac OS X as much as I expected to when it was first released, but when I do, one of the few widgets I employ is Delivery Status, which keeps track of packages during shipment. Big, bold numbers display the days until delivery, and smaller text reports on various stops throughout the package’s voyage. With support for over 30 carriers, including all of the most common here in the U.S., Delivery Status conveys what you need to know at a glance, making it an ideal Dashboard widget. Also in the works is an iPhone/iPod Touch application serving the same purpose with an interface optimized for touchscreen devices.

How to Combine ICO Files into a Windows EXE

July 22, 2008

Lately I’ve been working with Mozilla’s XUL platform under xulrunner, and found that I needed to make a properly branded Windows application, but had no tools or knowledge on how to “glue” standard .ico icon files together, or insert them into an already-compiled .exe file. After some research and a little trial and error, I found a method that works. Assuming you have some prepared 16, 24, 32, and 48 pixel images suitable for an icon set, here’s how to go about getting them from Photoshop into a Windows application, using only free software.

Photoshop to Multiple .ico Files

The first step to branding a generic executable with your own icons is to get them out of the graphics program and into .ico format, which is the standard for Windows software icons and cursors. IcoFormat, a free Photoshop import/export plugin for handling .ico files, will easily handle the task. Once installed to your Photoshop plugins folder (and Photoshop subsequently restarted), you can save each of your icons as a .ico file using “Save As…”, and choosing ICO from the Format menu in the resulting dialog. Repeat for each icon size you wish to embed (or, if you’re ambitious, try recording a Photoshop action to automate the process).

Multiple .ico Files to One .ico File

To allow Windows to display the best size icon for the current folder view, it’s best to combine the desired .ico files into a single file. The free Icollator program will take in multiple icons and produce a single .ico file ready for embedding. You may need the Java Runtime Environment to run Icollator, if you don’t already have it. Like Icollator, JRE is also free download.

Embed the .ico File

The last step is to embed the single .ico file (containing two or more icons) into the .exe. Launch the freeware Resource Hacker utility, and Open the target .exe. Then select Action -> “Add a new Resource…”, and pick the combined .ico file you made in the previous step. Give the resource a simple name like “ICONS”, and click Add Resource. Save the changes to the .exe, and switch to Windows Explorer. You’ll notice that the .exe now has the embedded icon set, and Windows will show the correct size icon for the current view mode.

Also, you’ll notice that Resource Hacker made a backup of the .exe before embedding, just for safe keeping. Also potentially of interest: Getting application name and icon right with XULRunner from the AdBlock Plus blog
Boot Camp: Last Resort

July 16, 2008

In my endless tinkering with my computer set-up, I ran into my second major issue with Boot Camp, and managed to find a working solution worth documenting. Starting with a single Mac OS X Leopard volume, Boot Camp Assistant kept failing and reporting “not enough space left on device” while attempting to live-partition my hard drive into two partitions for OS X and Windows (newer versions of Mac OS X can partition hard drives while booted, without any formatting). However, I had over 50% of the drive’s capacity free, so there should have been lots of space left on the drive. Clearly something was amiss…

Having started out with computers as a relatively old school Mac user – one who had to backup and erase a hard drive to partition it – I was immediately suspicious of the new-ish live-partition tool. To work around that, I tried booting the Leopard DVD and running Disk Utility from the Utilities menu, then partitioning the drive using that method. Again, I was met failure, but with an ambiguous “partition error” on which Disk Utility did not elaborate. The “Verify Disk” command reported that my volume was in good shape, despite my suspicions of corruption. DiskWarrior 4 also confirmed that the volume’s directory structure was intact. With 90+ GB free on my MacBook Pro’s 160 GB disk, how could I have “not enough space” to simply slice off a 20 GB Windows partition for run-of-the-mill use?

Out of quick-fix ideas, I decided to back up my Mac OS X volume, erase the drive, partition it, restore my OS X image to the big partition, then install Windows to the new smaller partition. Without a network-ready imaging utility like Ghost or TrueImage for Mac OS X (are there any?), I had to do this a slightly more complicated way:

  1. Boot Mac OS X and connect to a network share on another computer (a networked PC, in my case).
  2. Run SuperDuper! and back up the entire contents of the drive to the other computer.
  3. When done, boot the Leopard DVD and run Disk Utility again, and erase and partition the drive into one HFS+ Journaling partition for Mac OS X and one FAT32 partition for Windows.
  4. Boot a Windows CD, and “quick format” the FAT32 partition to NTFS (since Disk Utility can’t natively create an NTFS volume), then install Windows.
  5. Install Boot Camp drivers from the Leopard DVD: The Windows volume on the Leopard DVD contains the necessary Boot Camp drivers. Nice touch, Apple!
  6. Boot from the Leopard DVD again, but run Terminal this time – there’s no point-and-click way to connect to a network share from the DVD…
  7. Typically, you’d do mount_smbfs to connect to a Windows share, but it failed with mount_smbfs: failed to load the smb library: Unknown error: 1102" (No luck with mount -t smbfs, either). mount_afp appears to work, though.
  8. With no way to use SMB to get at the imaged Mac OS X volume made earlier, I downloaded a trial version of Extreme-Z IP, which provides AFP file and printer sharing support for Windows. After skipping prompts about Printer Sharing and automatically importing my SMB/Windows shares, it worked beautifully.
  9. Back at the Terminal on the MacBook, mkdir /Volumes/Sharename; mount_afp afp://username:password@192.168.1.10/Sharename /Volumes/Sharename mounted Sharename from the PC onto /Volumes/Sharename on the Mac over Ethernet. (The hidden /Volumes/ folder is where all connected Mac volumes show up).
  10. Back under Disk Utility, I was almost able to Restore the disk image to the proper volume over the network as if it were a local volume, but… it was grayed out in the file picker dialog.
  11. The “Scan Image for Restore” button resulted in a failed process, but it DID add the disk image to the sidebar of Disk Utility, which enabled drag-and-drop such that I could restore it to the HFS+J volume.

After a few hours of restoring data, my MacBook Pro is back, with Mac OS X on one volume just as I left it right before the imaging, and a fresh Windows install on the other. Surely Apple never meant for Boot Camp to be this complicated, but they underestimated the extent of my tinkering and day-to-day use! I hope my documentation can help someone in a similar situation.

Resources

SmartSleep

May 9, 2008

SmartSleep is one of those “I wish I knew about this earlier” pieces of software that saves me several minutes every day when I put my MacBook Pro to sleep. Intel Mac laptops (and some of the late G4 laptops) have three sleep states: basic sleep, sleep and hibernate, and full-on hibernate. Sleep is the basic low-power mode, and hibernate actually writes the contents of RAM to disk to conserve even more battery power and prevent the contents of RAM from being lost in the event of a power outage. By default, Intel Macs do the latter, and spend 20 to 60 seconds dumping RAM to disk before going to sleep, depending on how much RAM you have installed. If you happen to run your Mac on AC power most of the time, waiting for the disk to spin down can feel like minutes, but SmartSleep lets you safely switch between sleep modes. After setting my MacBook Pro to sleep only, it blinks off and spins down in only a second or two – a huge improvement in sleep time. This “feature” has been bugging me for the last several months, and SmartSleep effectively adds the system preference that Apple forgot.

Rackmount G4

April 8, 2008

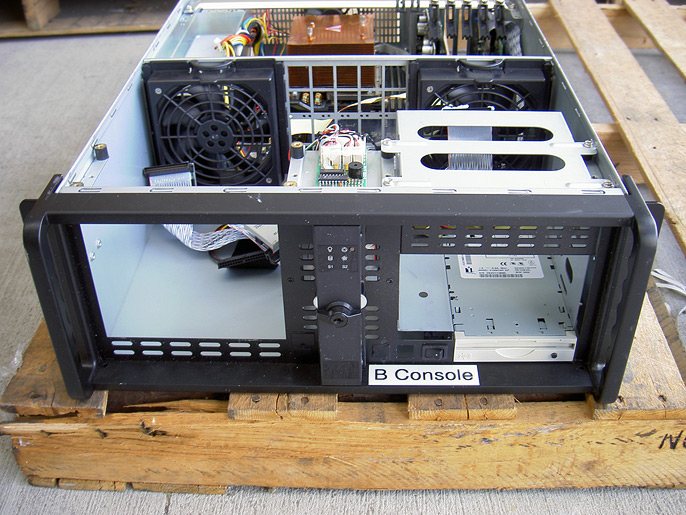
I took a trip out to my previous employer’s business to check out an interesting find he stumbled upon in a purchased lot of computer equipment. Among other official Apple-branded machines and workstations were several apparently custom built 3U rackmount G4 servers.

g4_front

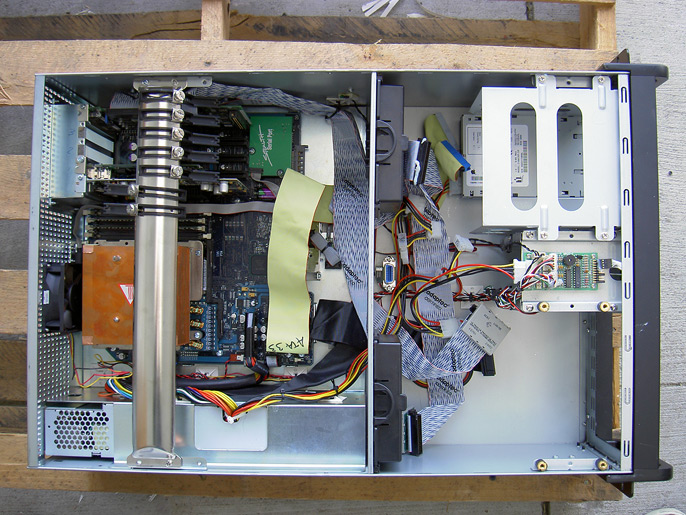
I took a bunch of pictures documenting the meticulous overhauls that were done in readying the new machines for about 8 hard drives, plenty of PCI cards, and proper cooling. Judging by the labels left on the converted towers, they were intended to be used as ProTools workhorses, mixing audio and piping effects around someone’s once-elaborate pro audio setup. Aside from the unique form factor (for a Mac-based server, anyway) and the sheer geekiness of such an undertaking, the power controls and cooling system are of particular interest.

g4_top

The one really interesting bit of circuitry in the whole system is one tiny Marathon power board, which connects to the relocated front panel board of the original tower. Several years ago, Marathon Computer offered rackmount conversion kits for Apple’s G3, G4, and even iMac systems. These enclosures appear to be made by I-Star, despite similarities to Marathon’s PowerRack kit, though pictures and documentation about Marathon’s kits are now extremely hard to find.

To keep the system and its veritable wall of hard drives running cool and trouble-free, large fans were employed in conjunction with a simple, off-the-shelf fan controller which combines the feedback from multiple fans into one monitoring port, complete with overheating alarm and adjustable temperature settings (via jumpers).

For completeness, a SCSI card and stealth serial port were added, leaving room for ProTools PCI audio cards. In its day, this was a screaming system that bested even Apple’s top PowerMac offerings. Someone clearly spent many hours getting the physical layout and electrical systems just right, which I thought was worth preserving and sharing.

Mastodon