Use Any DVD-ROM With a Modded Xbox
This hack will show you how to use just about any normal “IDE”/ATAPI DVD-ROM drive with a modded Xbox. It is based on a tutorial located at xbox-scene.com’s tutorials section, written by a guy known as Superfro. His tutorial showed how to use a specific DVD-ROM with your modded Xbox, but this one aims to teach you how to use just about any that fits certain requirements. Basically, you’re going to fool the Xbox into using your standard PC DVD drive by piping signals from inside it to the Xbox power connector wires.
This article isn’t for people just starting out with Xbox modding – it involves circuit probing, fine tip soldering, logic gates, and some signal comparison. It wouldn’t hurt to read, though, if you’re curious as to how to perform this hack.
The Good
What benefits are there to having a PC DVD-ROM in your Xbox? For one, it makes an easy replacement for DVD drives that have died on an existing Xbox. It also adds the ability to read DVD+R/W discs and CD-R as well. The loading times off a replaced drive are also noticeably faster while playing a game or skipping through a DVD movie.
The Bad
Why would you not want to do this? The biggest drawback is that only the original Xbox DVD-ROM (3 models) or a modified Samsung 616-T can read retail off-the-shelf Xbox games. A replacement PC DVD-ROM drive will not let you play those games. However, if you’re like me and don’t play but one or two store-bought games, this may be a worthwhile option.
The Ugly
What does replacing the original Xbox drive with a PC drive entail? For one, you need to be able to replicate the signals of an authentic Xbox DVD drive. You also need to make the Eject button on the Xbox talk to the replacement drive. Lastly, and maybe optionally, you can use your Dremel and fit it in nicely and make it look good.
Opening The DVD-ROM
The first step to this hack is finding out if your PC DVD-ROM meets the requirements for being an Xbox DVD drive replacement. These requirements are imposed by the Xbox DVD drive’s non-standard power connector. Normal PC DVD-ROM drives have a 4-pin Molex connector, supplying 5 and 12 volts. The Xbox DVD drive has these wires, but also some extra status lines such as eject, disc in/out, and tray open/closed. To find out if your drive will work with the Xbox, you need to open up the DVD-ROM and poke around to try and find the necessary signals. There are generally four screws on the bottom of the unit which, once removed, allow the bottom cover to come off, exposing the main circuit of the DVD drive. This is the most you should need to take apart the drive to work with it.
The Tedious Part
With the bottom cover off, carefully power up the drive (possibly with a spare computer power supply). Using a digital logic probe, available for around $10 from your local RadioShack store, choose a point on the DVD drive’s circuit, touch the logic probe to it, and open the drive’s tray. What you’re looking for is a point on the board that changes depending on the status of the tray. Sometimes you’ll get lucky and find two points that are exactly opposite each other, which makes the next step easier. Quite often I’ve found that these points are near the pushbutton that opens and closes the drive. The minimum you need, though, is a point that is one signal (high or low) when the tray is open, and the opposite when it is closed.
Repeat this process for finding a point that indicates that a disc is in the drive, and also for when the disc is fully spun up and ready to be read. I find it easier to turn the drive on it’s side for this part, since it’s a hassle to get a disc into a tray-loading DVD drive while the whole unit is upside-down. You’ll likely spend a lot of time opening and closing the drive, and putting in a disc and taking it out. Sometimes finding the necessary signals takes minutes, sometimes an hour. Shortcuts include memorizing the signal states of a small area of points, making a change in the drive’s status, then re-testing that area and comparing the signals in your head.
You’ll also need an “eject” signal, but this should not be hard to find. Probe around the circuit where the eject button on the front of the drive is attached. You should be able to find a point that inverts signal when you press the eject button. In all, you should have at least three signals mapped out (tray open/closed, disc in/out, and disc-ready). In the next step you will be connecting the status lines to the Xbox and running the Xbox’s eject button to the DVD drive (so that the DVD-ROM drive opens when you press the Xbox eject button).
Connecting The Drive
Once you’ve found distinct tray open/closed and disc in/out signals on the DVD-ROM circuit board, you need to connect them to the Xbox. Keep in mind that the signals may be the inverse of what you want. That’s okay, because you can change them with some simple logic gates. The Xbox-Linux team has done a wonderful job in mapping out the hardware of the Xbox, part of which is extremely helpful here. They’ve mapped out the Xbox DVD drive connector and labeled what each pin is used for.
What you need to do is write down the signals that you have on your PC DVD-ROM drive and see how they match up with the ones the Xbox is expecting to see (from what it would believe is a stock Xbox drive). Using the diagram and description of each pin, you should be able to match up the pins. If the signals you have are opposite that, you’ll need to use a logic gate chip to run your signal in, along with either power or ground, then run the output of that gate to the appropriate Xbox line.
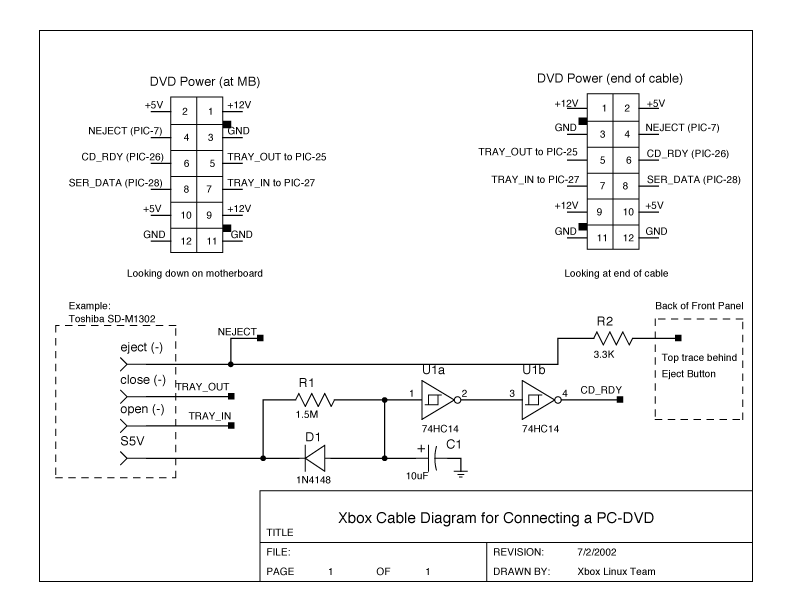
If you only found one of the two tray open/closed signals above, you can duplicate and invert the one you found using another gate on the logic chip. Run the signal you found to the matching one on the Xbox DVD power connector, but also run it to the logic gate and connect the output of that to it’s matching pin as well. That should satisfy the need for the tray open/closed signals.
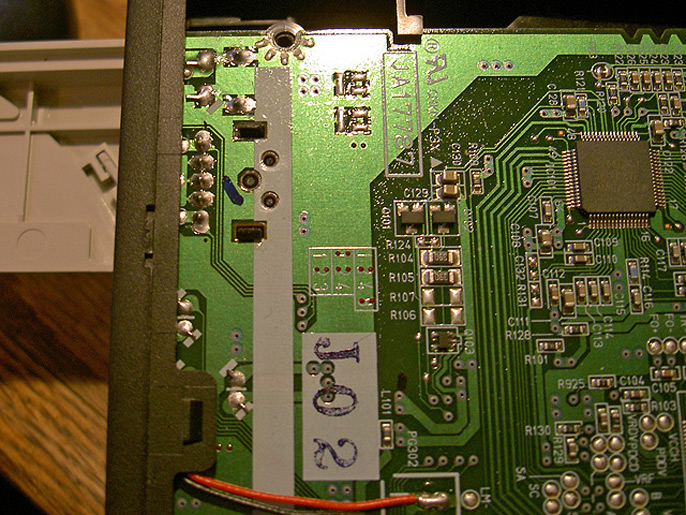
You will also need to connect the eject button the the back of the Xbox front panel where the eject button’s leads are exposed, making sure the signals match when you press the button. What you are doing is wiring the PC DVD drive eject button to the Xbox’s eject button, so that both the Xbox and your PC DVD drive get the eject signal when you press the on on the front of the Xbox.
Xbox-Linux.org has more to say about interfacing the drive (referencing their diagrams):
In order to interface a PC-DVD, the cover of the DVD drive must be removed and appropriate signals located. Usually, signals such as
OPEN,CLOSE, andEJECTcan be found. This are normally low true signals, in spite of the names, so they likely correspond withTRAY_IN,TRAY_OUT, andNEJECT, respectively. TheCD_READYsignal is the most difficult to locate. On one drive, a signal calledDMUTEwas located that worked as needed. This was the DVS DSR-1600H, however, this drive is not compatible due to spin down. The Toshiba SD-M1302 is a compatible drive, but requires some logic to delay a signal so that theCD_READYsignal is not active until the drive is really ready to provide data.In addition, if it is desired to have the eject button on the PC-DVD inform the Xbox that the CD has been ejected, then a connection must be made from the
NEJECTwire to the back of the Eject button on the front panel. The correct trace is the top one through an opening in the metal shielding. From the back, you can see four PCB pads, and the top two are connected together with a PCB trace. This is the location to connect theNEJECTsignal, through a 3.3K resistor for a wired OR connection.
Finishing Touches
With the new DVD drive wired up and working, you may want to fit it nicely into the Xbox case. If you cut two of the posts in half which held up the Xbox DVD drive, it should slide in further, allowing you secure it down.
Hopefully, all that will give you some idea as to how to add a PC DVD-ROM to your Xbox. Xbox-Linux.org page on DVD replacement also has a lot of good information. If you have questions, add them to the comments and I’ll be happy to answer them.